Microsoft Windows
How to install Windows 11 on an unsupported PC
Feb
1) Editing the Windows Registry
The first thing we have to do is enter the Windows 10 Registry Editor. For that, it is enough to write the name of this function after opening the start menu, or if you want it faster, open start and type regedit.
Next, you have to enter the following address within the registry: HKEYLOCALMACHINESYSTEMSetupMoSetup. To do this, you can navigate through the different folders in the left column until you get there, or type in the address bar above in the registry editor ComputerHKEYLOCALMACHINESYSTEMSetupMoSetup.

In here, right click on the background of the folder. In the context menu, choose the New option, and create a new DWORD (32-bit) registry with the name Allow UpgradesWithUnsupportedTPMOrCPU with value 1. To set its value, first create the registry with the name that we have told you and then double click on he. When the window opens, in Value information put a 1.
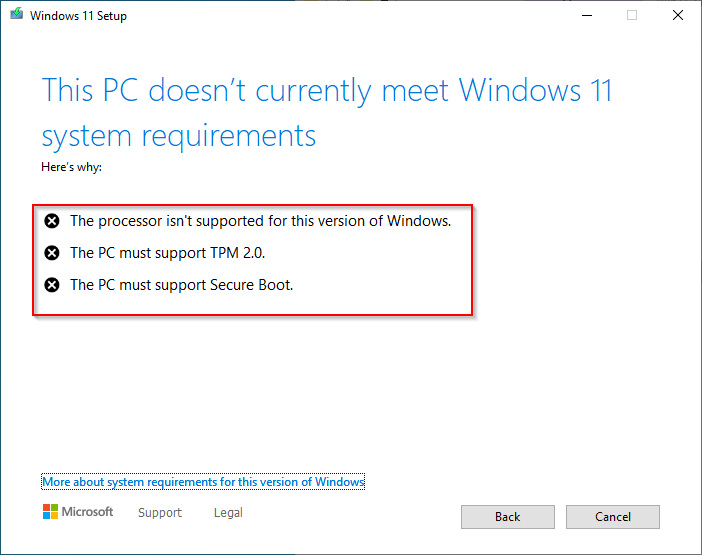
Now, simply restart Windows 10 and check for the update. This method is not entirely safe, as errors can be caused by incorrectly editing the system registry. Also, this only works when you have TPM 1.2 instead of TPM 2.0, and nothing ensures that Windows 11 will work correctly because This will prevent Windows 10 from blocking the update to Windows 11 when we try to force it by running the installation wizard if we do not have the correct TPM or CPU version.
2) Using an installation USB
The second method is easier, and is to create an installation USB. For that, you have to go to the Microsoft.com/es-es/software-download/windows11 website, which is the official page where the official Windows 11 installation files are hosted. Here, click on the Download Now button of Creating Windows 11 installation media.


You will enter a screen called Select USB Flash Drive. In it, you simply have to choose the letter that corresponds to the USB that you are going to use and press Next to create the boot on it. Here, if you are not sure what letter the USB is, you can open the Windows file explorer to check it.
You will go to a screen where the USB creation process will start. Simply, the program will do everything without you having to touch anything. First it will download Windows 11, and then the media file will be created with it. When it’s done, it will tell you that your USB flash drive is ready, and all you have to do is click Finish and the installation program will clean everything.
Now, you can now try to install Windows 11 on the unsupported computer. There will be times that you can do it from Windows 10 itself, other times you will have to start the PC from the USB to format and install from there, and other times it will simply not let you update. In my case, the best method has been to boot the PC from the USB and choose the advanced installation, in which I have deleted all the existing partitions and created new ones to install Windows 11 on top of.
Buy a Windows 11 License key